Clear the Jam in the Single Pass Duplex Automatic Document Feeder (DADH)
Article: 1335092
Published:
NOTE: To avoid damaging the printer, always remove misfed media carefully, without tearing it. Try to remove the paper in the direction that the paper would normally feed.
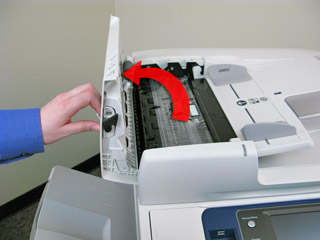
- Lift the lever and open the Top Cover of the Document Feeder.
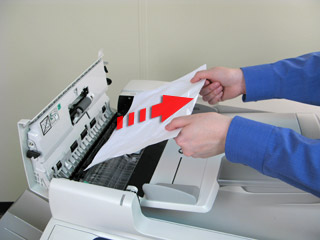
- If the original is not caught in the entry to the Document Feeder, pull the original straight out.
- Review the message on the Touch Screen and follow the instructions provided. If indicated, rotate the green wheel in the direction indicated in the message to remove the original from the handler.

- If indicated, lift up on the green tab to open the Inner Cover and rotate the wheel in the direction indicated to remove the jammed original.


- Close the Inner Cover, and then close the Top Cover. Make sure to press down gently on the cover until it clicks into position.
- Lift up the Feeder Tray and remove any paper in this area, and then lower the tray back into position.

- Lift the Document Cover to remove any originals in this area, then lower the cover back into position.

- If the original is not wrinkled or torn, load it back into the feeder following the instructions on the Touch Screen.
NOTE: After clearing a jam in the Document Feeder, reload all originals, including the pages already scanned. The printer will automatically skip the scanned pages and scan the remaining pages.
CAUTION: Torn, wrinkled or folded originals my cause jams and damage the printer. Place the originals face-down, one at a time, on the Document Glass to make a copy.